Shopify Sage Integration: How To Set It Up for Accounting

Written by Amy Crooymans, Product Marketing Manager at A2X
Updated on February 4, 2025
Setting up an integration between Shopify and Sage Cloud Accounting Software is a great way to improve accounting and bookkeeping accuracy and efficiency.
If you’re selling on Shopify – or, if you’re an accountant or bookkeeper who works with Shopify merchants – then you know the complexities that come along with Shopify accounting and bookkeeping.
Getting Shopify data to match up with transaction lines with Sage, split-month entries, and dealing with third-party apps are just a few hurdles that can all take a ton of time and cause massive headaches.
The good news: Using the right tool to integrate Shopify and Sage can automate Shopify bookkeeping, and make most of those headaches disappear!
In this guide, we’ll share how to integrate Shopify and Sage.
Key takeaways:
- Integrating Shopify and Sage means establishing a connection that enables your Shopify data to flow seamlessly into Sage for easy accounting and bookkeeping.
- Sage does not support a direct integration with Shopify, so you can use A2X to set up the integration.
- Setting up a Shopify-Sage integration with A2X is easy and just takes a few steps (outlined below).
Table of Contents
Integrate Shopify and Sage for accurate accounting
A2X auto-categorizes your Shopify sales, fees, taxes, and more into accurate summaries that make reconciliation in Sage a breeze.
Try A2X today
Can Shopify integrate with Sage?
Shopify can integrate with Sage using an app or a tool (such as A2X).
“Integrate” simply means setting up a connection between Shopify and Sage, so that the accounting data you need from Shopify flows into Sage.
Sage currently does not support a direct integration with Shopify, which means that you’ll need an additional tool to connect them together.
Why should I integrate Shopify with Sage?
Payouts from Shopify that end up in a bank account are not entirely made up of Shopify sales. They are actually a combination of sales, fees, refunds, sales tax, and other transactions.
While Shopify reports can help you get the information you need to understand the transactions that make up each payout, it can be incredibly difficult and time-consuming to digest this information and match it up with payouts in Sage.
With that in mind, there are two key benefits to setting up an integration between Shopify and Sage:
Save time with automation
Using a tool to integrate Shopify and Sage means that you can automatically get Shopify data into Sage, and reconcile your payouts in just a few clicks.
No more manual data entry or pouring over Shopify reports to try to get everything to match up.
Get accurate books
Accuracy is incredibly important when it comes to business numbers – one small mistake could cause a huge tax bill, poor business decision making (due to incorrect data), and all kinds of other frustrations.
Integrating Shopify and Sage can eliminate human error and improve bookkeeping accuracy.
Not only is this important for your Shopify store’s health, but it will also be important if you’re seeking a loan or investment for your ecommerce store, because potential lenders and investors will want to see an accurate P&L.
How to set up an integration for Shopify and Sage
As mentioned, Shopify and Sage currently do not directly integrate with each other, which means that you’ll need a third-party tool to get your Shopify data to automatically flow into Sage.
There are two types of tools you can choose from: data syncing apps, and ecommerce accounting automation apps like A2X.
Data syncing apps

You can use a data syncing app (e.g., Zapier) to establish a connection between Shopify and Sage that will automatically send data from Shopify to Sage. For example, you could set it up so that a new sale on Shopify triggers the creation of a new invoice in Sage.
While generic data syncing apps are versatile (and often free or low-cost), they can have a few shortcomings if you’re looking to get accurate Shopify accounting and bookkeeping data into Sage.
For example:
- They might not meet the unique needs of a Shopify store that a specialized app for Shopify and Sage accounting/bookkeeping can (e.g., supporting payments from payment gateways, split-month entries, etc.).
- They could only handle data for single orders. This might be okay for small Shopify merchants, but could overload Sage if you’re a merchant with a high volume of orders.
- They might not work for every kind of transaction.
- They might not be capable of recording tax details, like the difference between tax collected and tax paid through Marketplace Facilitator Tax.
- They might offer only basic support, which can be frustrating if you have a specific data syncing issue (or an accounting or bookkeeping issue).
Fortunately, there’s a better option, particularly for established Shopify merchants: A2X.
Use A2X to integrate Shopify and Sage
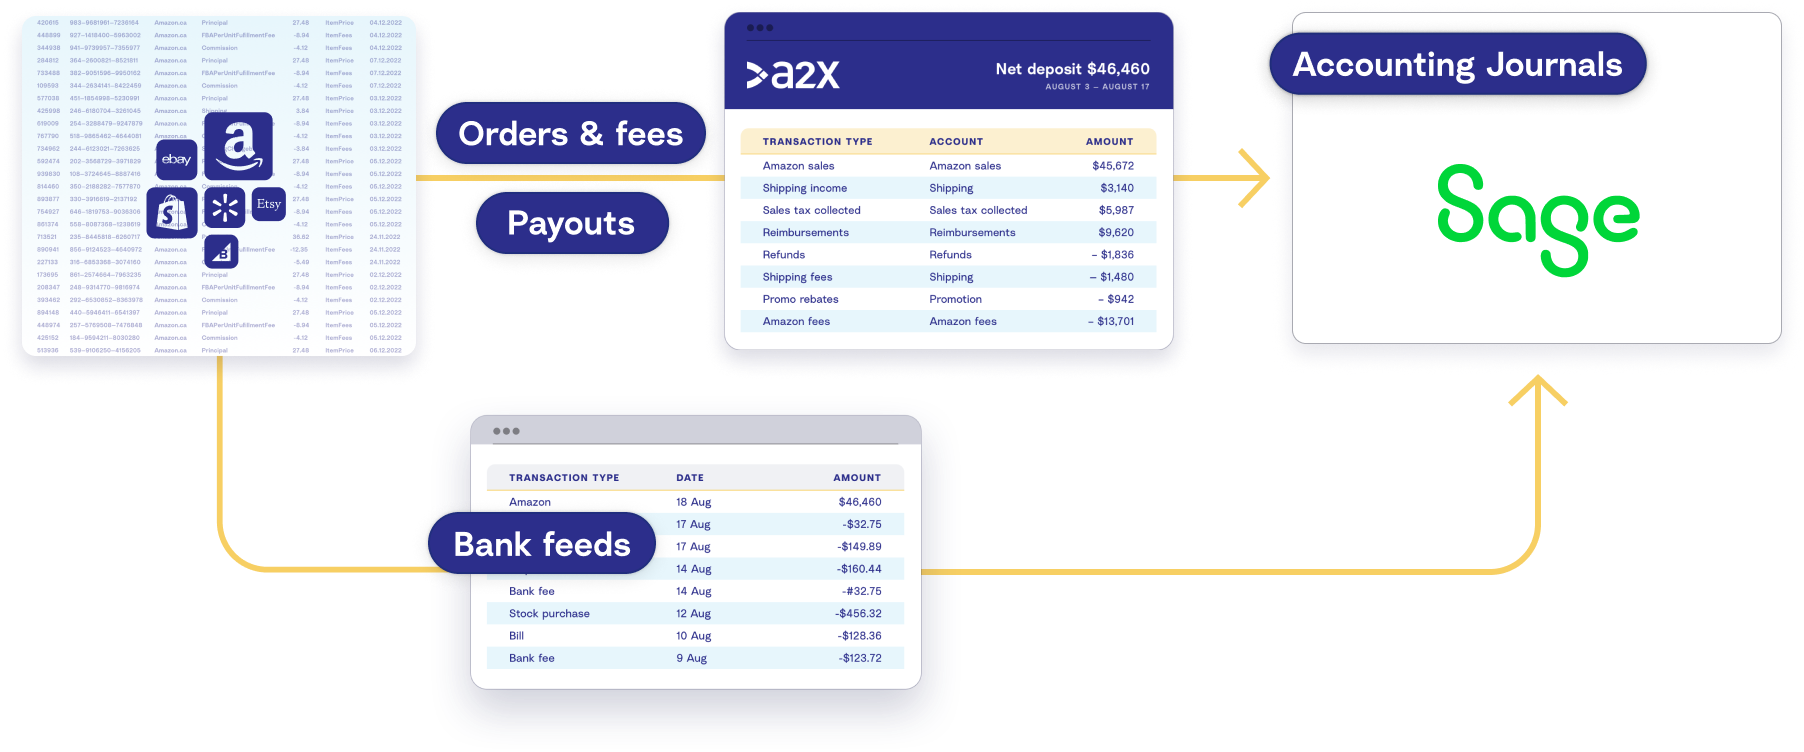
A2X is an ecommerce accounting automation tool specifically designed to integrate Shopify and Sage so that all necessary Shopify accounting data can flow seamlessly into Sage.
Here’s an overview of how A2X can integrate Shopify and Sage:
By integrating A2X with your Shopify and Sage accounts, you will have:
- Summarized invoices which show you the breakdown of your bank deposits without clogging your accounting system.
- Accounts organized via the accrual accounting method which allows cash flow to span months. This means that you can see a true picture of your business and make informed financial decisions.
- Payouts matched for you so that reconciliation just consists of confirming these matches within Sage.
- Accounts and taxes mapped once by you, and then applied automatically every time – just set and forget.
- Accurate accounts with nothing missed. Eliminate the risk of human error from manual calculations and leave it to the computers designed for repetitive tasks.
Shopify and Sage integration: Step-by-step setup guide
Using A2X to set up an integration with Shopify and Sage is easy.
It’s important to note that the steps below apply only if you’re on one of the following Sage plans:
- Sage Business Cloud UK (Plus plan)
- Sage One UK (Plus plan)
You can still use A2X if you use any of these other Sage plans; however, you’ll need to get in touch with our Customer Success team at contact@a2xaccounting.com to get set up:
- Sage Business Cloud Start plan
- Sage50
- Sage US/CA (all versions)
- Sage EU (all versions)
Step 1: Sign up for an A2X free trial
Go to a2xaccounting.com and click ‘Try A2X for free’ in the top right.
You’ll then be asked which sales channel you’d like to connect to first. Select ‘Shopify’.
Choose your preferred sign in method on the next screen, then follow the prompts to create your account.
Once you’re done setting up your A2X account, you’ll be directed to the A2X dashboard.
(Note – Your A2X account will remain in “free trial mode” until you decide to subscribe to a plan. In free trial mode, you’ll have access to a limited amount of Shopify payout data.)
Step 2: Connect A2X to Sage
In the A2X dashboard, you’ll see a prompt to connect to your accounting software. Select the Sage logo, then click ‘Connect to Sage’.
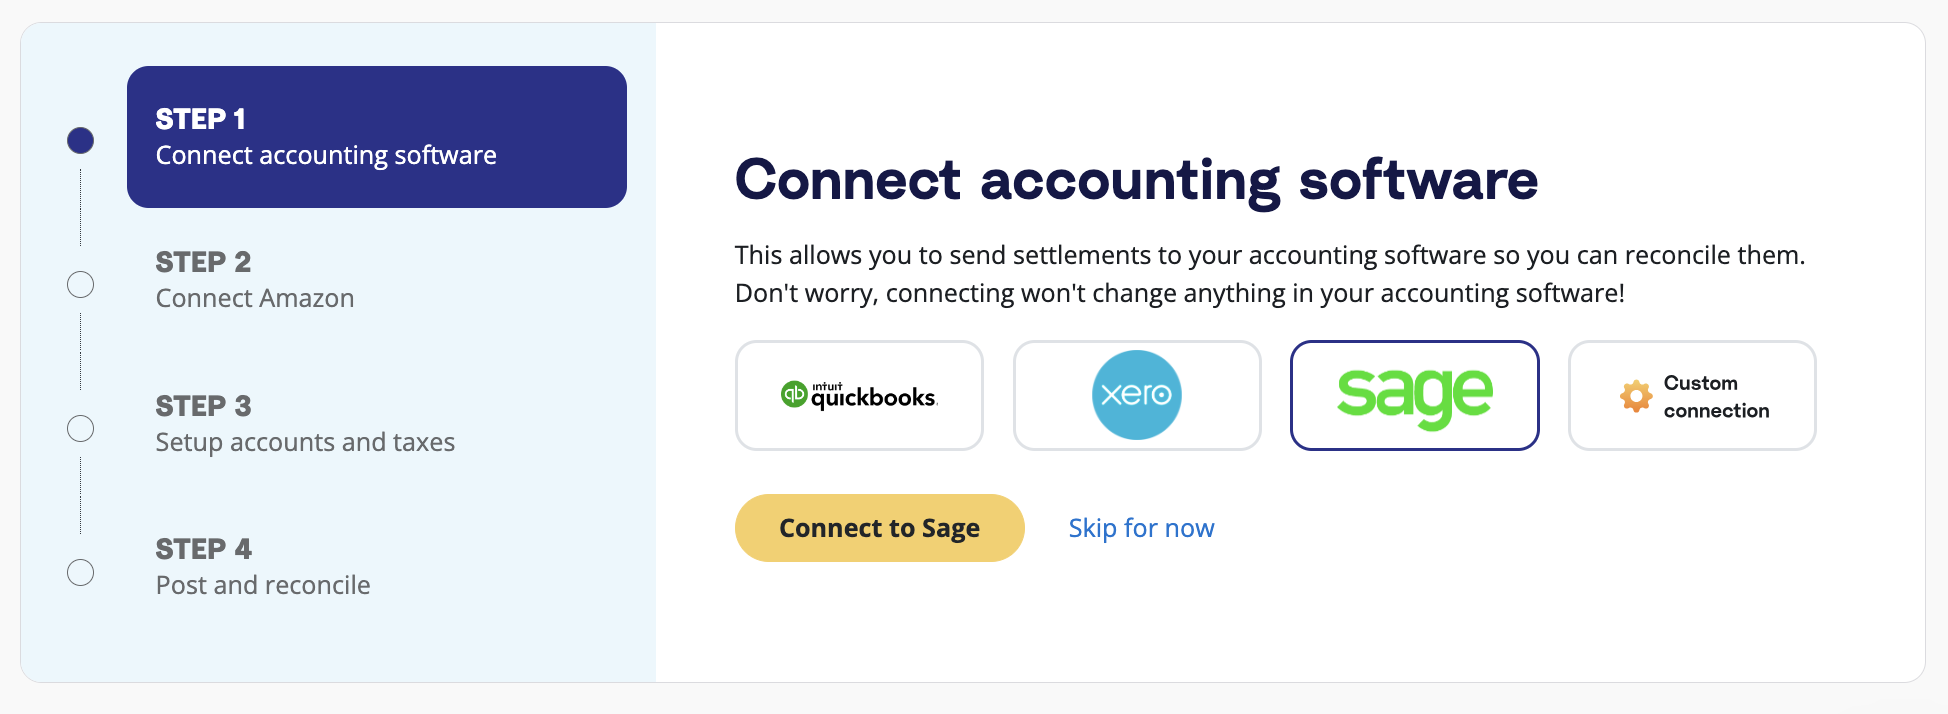
Follow the prompts to establish a connection with Sage. All you’ll need is your Sage login.
Step 3: Connect to Shopify
Next, you need to connect A2X to Shopify so A2X can fetch your payout details.
On the A2X dashboard, you’ll see a prompt to connect Shopify.

If you have access to the Shopify store, select ‘I have access’. Enter your store URL, then follow the prompts to grant A2X permissions.
If you do not have access to the Shopify account you wish to connect to (e.g., you are an external accountant or bookkeeper working with a Shopify merchant), click ‘I need to request access’ and follow the prompts to request access from the Shopify merchant you’re working with.
Step 4: Map Shopify transactions to the Chart of Accounts
Note – we strongly recommend working with an ecommerce accountant or bookkeeper to help out with accounts and tax mapping in A2X.
In this step, you’ll assign Shopify transactions to your Chart of Accounts. Once this is completed, whenever a new settlement comes in, each transaction will be automatically mapped to the correct account.
To set this up, click the ‘Setup Accounts and Taxes’ prompt on the dashboard. Or, click on the ‘Accounts and Taxes’ tab near the top.
The first time you land on the Accounts and Taxes page, you’ll be prompted to go through an Assisted Setup questionnaire, which asks you to provide basic information about your business, such as where it operates.
At the end of the questionnaire, you’ll be asked if you’d like to move forward with an ‘Assisted setup’ or ‘Custom setup’:
- Assisted setup (recommended): A2X will automatically apply best practice recommendations to your new A2X account for accurate ecommerce accounting. These recommendations include creating the Chart of Accounts in Sage, transaction mappings, and tax configurations.
- Custom setup: If you prefer to map your own transactions, you can choose your own accounts and taxes for each transaction type rather than an A2X generic default. To do this, click the down arrow next to a transaction type and find the account you want from your Chart of Accounts list.
If you select Assisted Setup, A2X will automatically map your Shopify transactions as follows.
Transaction Type | Category | Default Account Name | Account Type |
Discounts | Income | Shopify Sales | Sales |
Gateway Transactions | Current Asset | Shopify Clearing Account | Current Asset |
Gift Card Liabilities | Current Liability | Shopify Gift Card Liabilities | Current Liability |
Other | Other | Shopify Fees | Expense |
Payment and Selling Fees | Expense | Shopify Fees | Expense |
Pending Payments | Current Asset | Shopify Pending Balances | Current Asset |
Refunds | Income | Shopify Refunds | Sales |
Sales | Income | Shopify Sales | Sales |
Shipping Income | Income | Shopify Shipping | Current Liability |
Tax | Tax | Shopify Sales Tax Collected | Current Liability |
When you’re all done reviewing your mappings, remember to click ‘Save’.
Step 5: Send payout information to Sage
Now it’s time to do what A2X was meant to do – make Shopify bookkeeping easy with Sage.
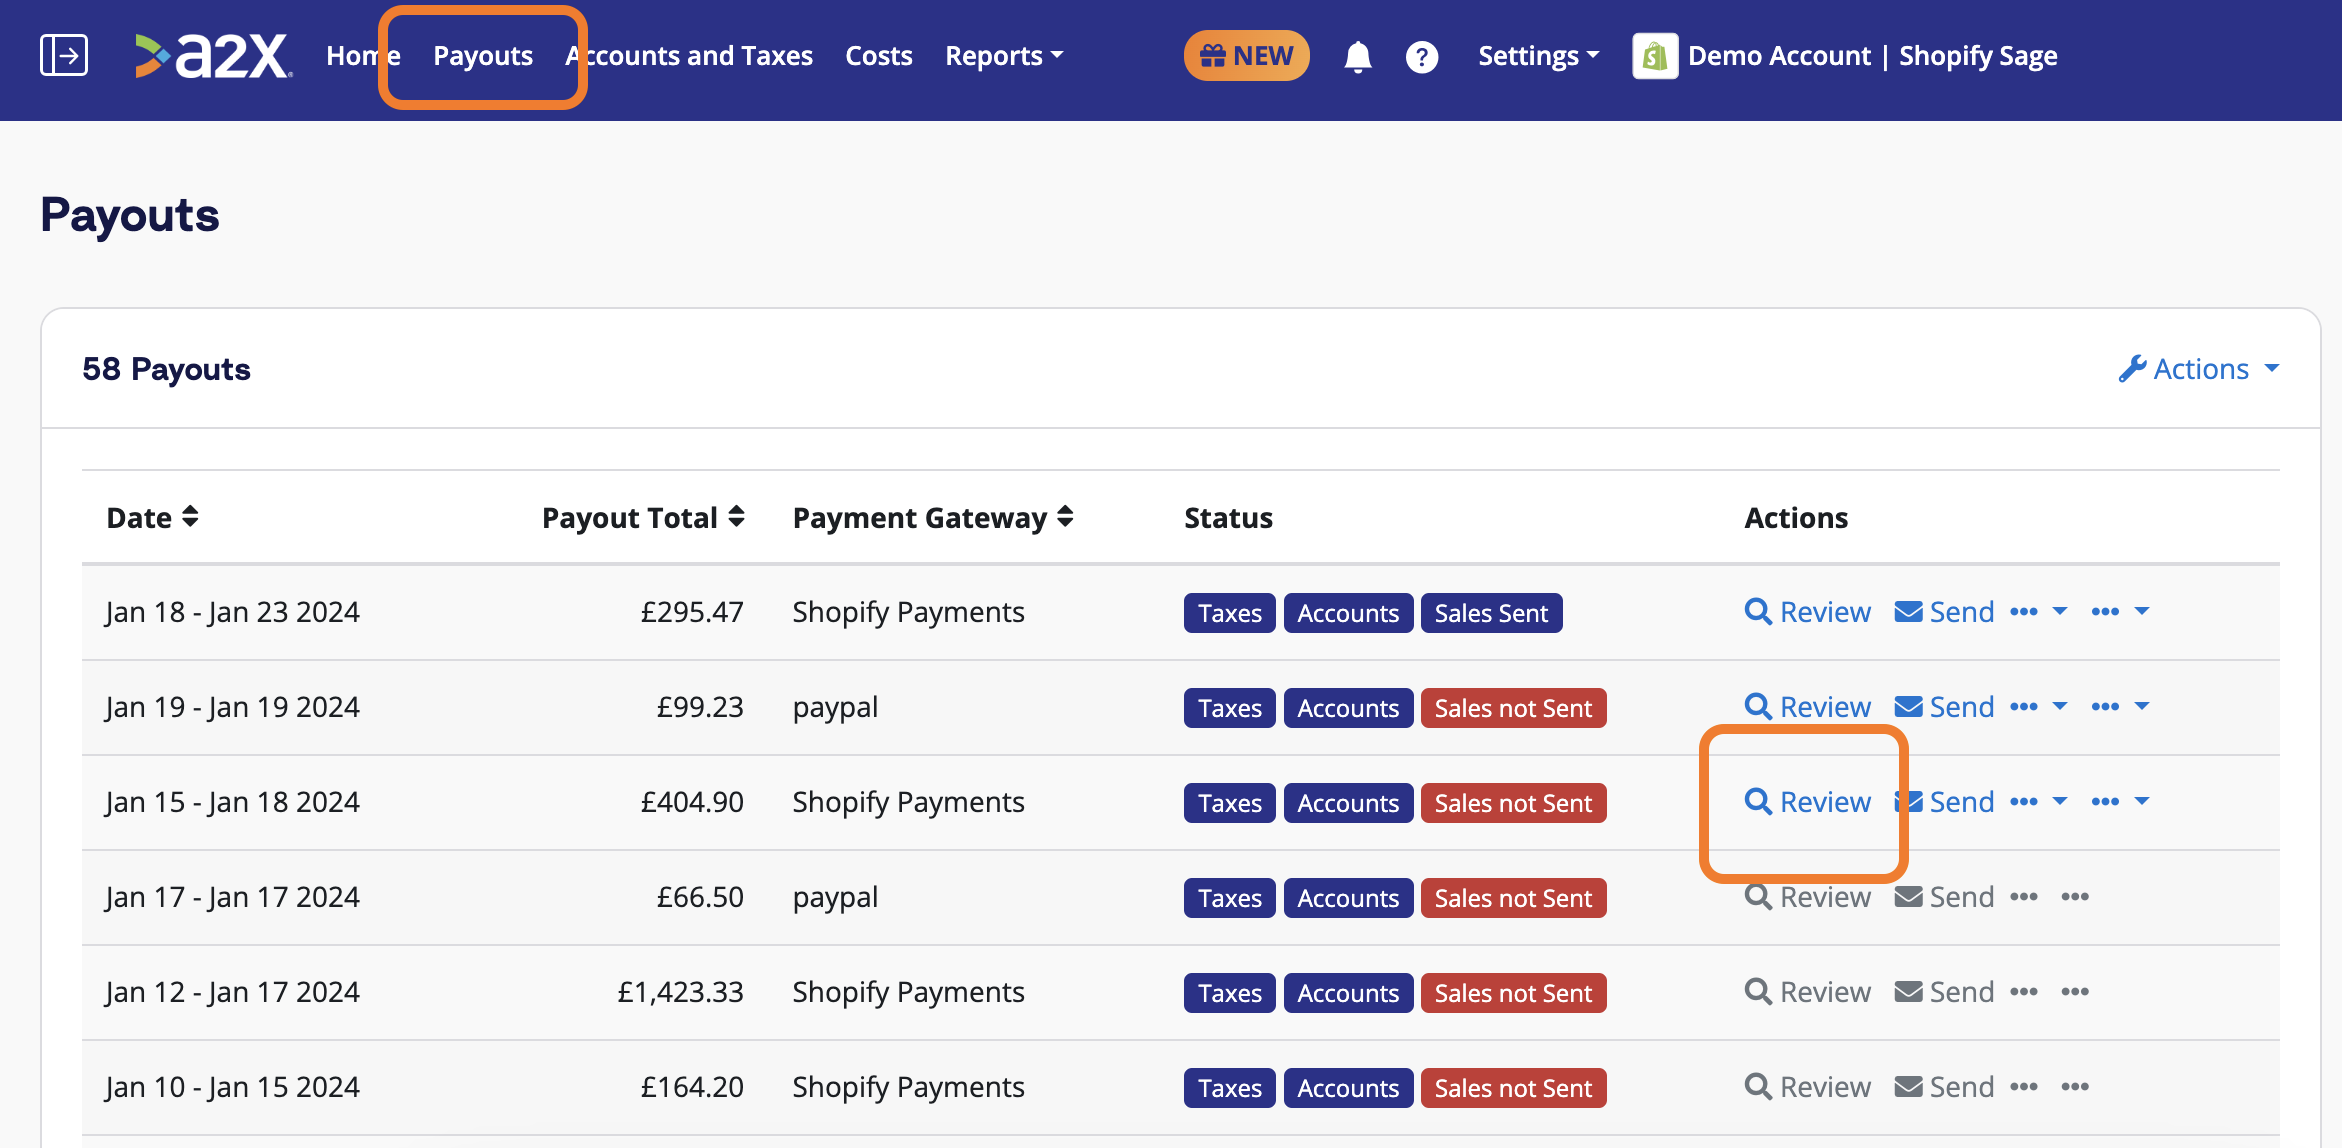
Click on the ‘Payouts’ tab in A2X. Here, you’ll see the recent payouts that A2X has fetched from Shopify. (If you’re in free trial mode, you’ll see three settlements available.)
Click ‘Review’ to the right of a settlement to see the transactions that make up that settlement, and how A2X has mapped them to the Chart of Accounts.
If all looks good, scroll to the bottom and click ‘Send to Sage’.
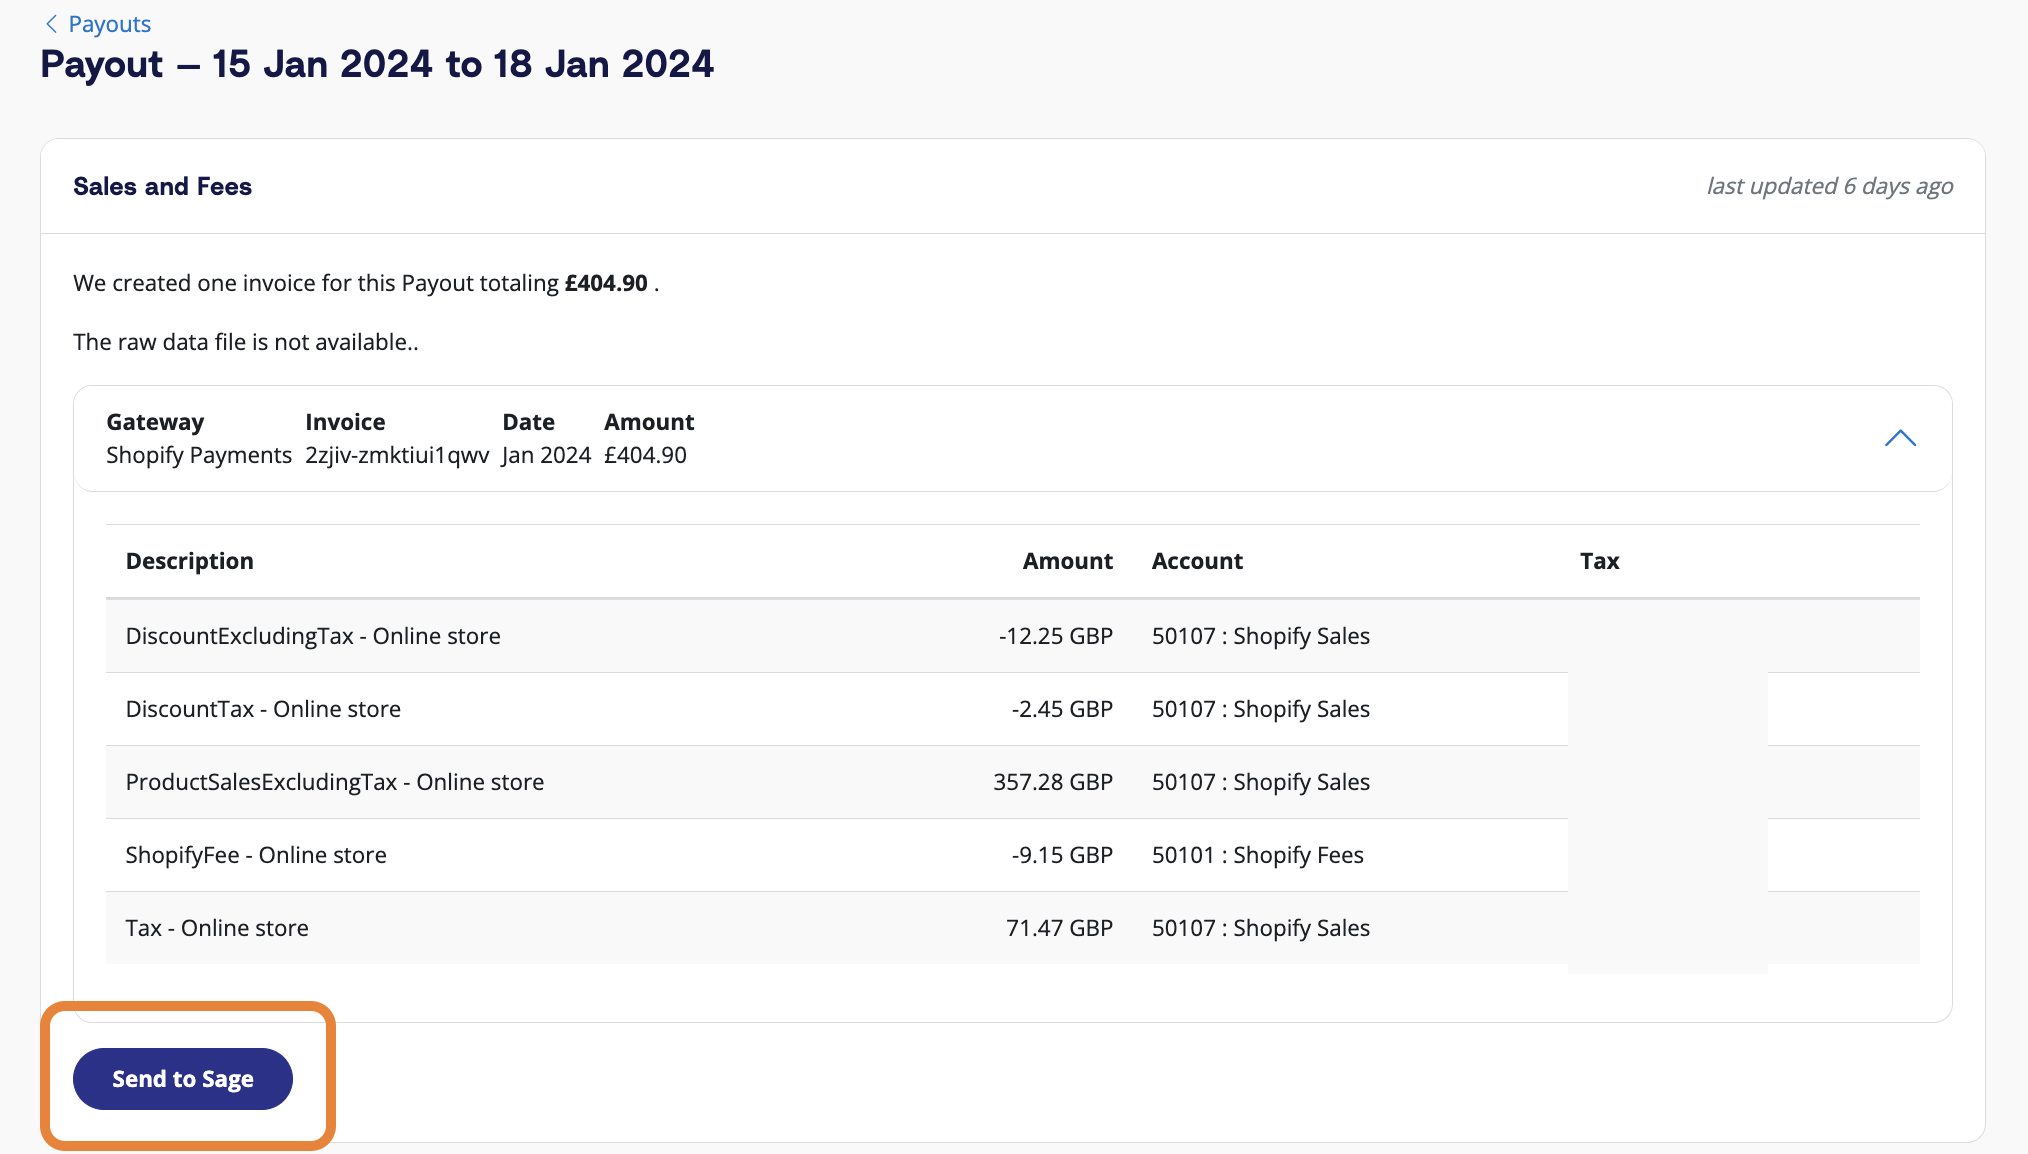
A2X will then send the settlement data over to Sage, where it will be matched to the corresponding deposit in the bank feed.
You can also use A2X’s Auto-posting feature to automatically send settlements to Sage as they become available.
Step 6: Reconcile in Sage
Log in to Sage and navigate to the bank account, then click on ‘Imported Transactions’.
Find the deposit for the payout for which you just posted. You should see the corresponding A2X invoice there, too – ready to be reconciled!
And there you go – bookkeeping for Shopify with Sage has never been easier!
The Shopify Reconciliation Report: A2X’s commitment to accuracy
Once you’ve integrated Shopify and Sage with A2X, a key feature to explore is A2X’s Shopify Reconciliation Report.
As outlined above, Shopify bookkeeping can get really complicated (especially when dealing with payment gateways, different transaction types, VAT, lump sum deposits, etc.).
A2X is designed to make Shopify reconciliation quick and easy – and, most of all, accurate.
Despite A2X’s capabilities, discrepancies can still occur due to:
- Complex orders that don’t follow a “usual pattern” (e.g., partial payments) and can create an unordinary transaction history
- Third-party apps that can change order timelines
- Changes in the Shopify API that can impact how data is delivered or categorized
If you ever see a discrepancy between A2X’s summaries and Shopify data, you can use the Shopify Reconciliation Report to better understand and account for the difference.
The Shopify Reconciliation Report allows users to drill down into individual orders to identify differences between Shopify data and A2X summaries.
Without the Shopify Reconciliation Report, it could take hours of manual work to identify what might be causing your numbers not to balance.
No integration tool can be 100% accurate, but A2X is as close as it gets. The Shopify Reconciliation Report is a game-changer in Shopify accounting.
Get Shopify accounting expertise
If you’re a Shopify merchant and you’re feeling overwhelmed by your accounting and bookkeeping, it might be time to find a Shopify accountant who can help you know your numbers.
The A2X Directory is the perfect place to look for an accountant or bookkeeper who a) specializes in Shopify accounting/bookkeeping, and b) is a great fit for your business needs.
Ready to integrate Shopify and Sage with A2X? Start a free trial today!
Integrate Shopify and Sage for accurate accounting
A2X auto-categorizes your Shopify sales, fees, taxes, and more into accurate summaries that make reconciliation in Sage a breeze.
Try A2X today


